

Monday, December 20, 2010
Friday, December 10, 2010
Back finally!
I am back, finally. Christmas cards and packages are in the mail so I am pretty pleased with myself! After making so many Christmas cards I lost my mojo and the desire to make cards for a while.

This card is for a December birthday. The stencil I used is Happy Birthday Fun HBM 7001 found HERE The flower stamp is from a clear set by, I believe, Hampton Arts and the sentiment is from Stampin Up.


This card is for a December birthday. The stencil I used is Happy Birthday Fun HBM 7001 found HERE The flower stamp is from a clear set by, I believe, Hampton Arts and the sentiment is from Stampin Up.

This is the first easel card I have ever made. The card is for a young lady who just graduated with a Master's Degree. The inside if the card say's 'Wishing You a Bright and Shining Future'. The stencil I used for this card is EH1825, you can find it HERE The 3D flower is from a sheet I bought in England

Tuesday, November 23, 2010
By special request
I don't seem to be able to get away from Christmas cards! This card was made for my daughter to give to a friend's daughter. My daughter saw the stamp and thought it would be perfect for the young lady!
 The stamp is from the Snow Angels series by Stamependous which is probably discontinued now as I had a hard time even finding the stamps last year but I love them! For the background panel I used the Snowflakes Cuttlebug folder After stamping the image I used a Nestabilities star die to trace around a star omitting the stamping and cut it by hand. The other 2 stars are the next two biggest sizes cut with the Cuttlebug. The coloring is done with Prismacolor pencils and Turpenoid.

Wednesday, November 17, 2010

Tuesday, November 16, 2010
And more Christmas!
For these cards I went back to dry embossing with stencils which I haven't done in a while.


Monday, November 15, 2010
I couldn't help myself!


Thursday, November 11, 2010
Another Christmas card!
I promise this will be the last one for a bit. I am tired of making Christmas cards already as I am sure you are tired of seeing them!
 I really like this almost all white card with a touch of color. The poinsettia is a digi I found by doing a search for poinsettia coloring pages. The layer behind the image is hand embossed with the Romantic Style Fantasy EE 3425 stencil found HERE ( scroll down the page to find it) The sentiment is from a clear set by Flourishes stamped on a Cuttlebug label. To get the green border around the label I traced around the outside of the dye and cut it by hand. As I didn't have any red ribbon in the right shade I used a strip of card stock.

Wednesday, November 10, 2010


Tuesday, November 9, 2010
Digital Stamp Ornaments
As soon as I saw these digi stamps on Tracy's site, Fred She Said I knew I had to have them. I love instant gratification, click and they are on your computer! I printed a whole page and got to coloring. I have made 4cards with the stamps.
 The image is colored with Prismacolor pencils and OMS. I used a metallic gold gel pen to color the hanger and top of the ornament. The circles have glitter on them although it doesn't show up in the picture. After cutting the image out I mounted it with dimensional tape to a white panel embossed with a Cuttlebug folder.
 Again I used the Cuttlebug folder on the white panel but this time I used the other ornament stamp.There is glitter on the stripes which looks really pretty in real life but doesn't show in the picture.
I will be back tomorrow with more. These images are so much fun to color!


I will be back tomorrow with more. These images are so much fun to color!
Sunday, November 7, 2010
Tag, You're It!
Another card made for a swap on Card Camp where we were to use a tag on our card.

The tags were cut from white cardstock and stamped with a flower stamp from a clear set. The flowers were colored with Prismacolor pencils and OMS. I used a chalk ink on the edges of the tags and a Cuttlebug Tiny Mosaic folder for the green panel. The glitter that I used on the centers of the flowers doesn't show in the picture. The tags are raised with dimensional tape.

The tags were cut from white cardstock and stamped with a flower stamp from a clear set. The flowers were colored with Prismacolor pencils and OMS. I used a chalk ink on the edges of the tags and a Cuttlebug Tiny Mosaic folder for the green panel. The glitter that I used on the centers of the flowers doesn't show in the picture. The tags are raised with dimensional tape.
Saturday, November 6, 2010
Tutti Fruiti
This is a card I made for a Tutti Fruiti swap on Card Camp where we had to use fruit on our card. I hope the recipient likes it! If you would like to join Card Camp click on the logo on the right to find out more about this group.

The cherry image is from Lockhart stamps and the sentiment is a $1 stamp from Michaels. I used a Nestie square die to cut an apperture in the white panel and then lined it with the checkered paper. The embossed lines were done on a Martha Stewart score board and the image is raised with dimensional tape.

The cherry image is from Lockhart stamps and the sentiment is a $1 stamp from Michaels. I used a Nestie square die to cut an apperture in the white panel and then lined it with the checkered paper. The embossed lines were done on a Martha Stewart score board and the image is raised with dimensional tape.
Friday, November 5, 2010
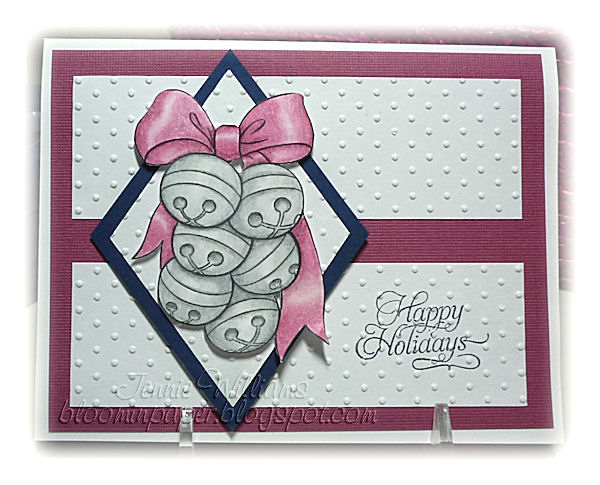
Jingle, Jingle, Jingle


Tuesday, November 2, 2010
Two for Christmas
I finally have something to post! I wanted a quick and easy card to make in multiples for Christmas, not too much coloring.
 This card was made mainly with scraps. How is it that the pile never seems to get less?! The snowman is a Hampton Art stamp colored with Prismacolor pencils. I used a round Nestie to cut him out leaving a part of the bird outside the circle.

This is another quick card stamped with Versamark ink and embossed with gold detail embossing powder. I embossed the green panel with the Cuttlebug folder D'vine swirls and then used a metallic gold gel pen to make dots around the swirls.


This is another quick card stamped with Versamark ink and embossed with gold detail embossing powder. I embossed the green panel with the Cuttlebug folder D'vine swirls and then used a metallic gold gel pen to make dots around the swirls.
Saturday, October 30, 2010
Noel
I made this card for a challenge on Card Camp which is a group I own on Yahoo. If you would like to join us we would love to have you! You can just click on the button on the right of this page.The challenge is just for fun and was to make a card where the greeting is the focal point. I think this card would be great for a male.

The background on the card base was done with Antique Linen Distress ink and a Marble Texture Cube from Stampendous. The greeting is a $1 stamp stamped with Versamark ink and embossed with gild embossing powder although the sine doesn't show in the picture. A couple of scraps and it was done!

The background on the card base was done with Antique Linen Distress ink and a Marble Texture Cube from Stampendous. The greeting is a $1 stamp stamped with Versamark ink and embossed with gild embossing powder although the sine doesn't show in the picture. A couple of scraps and it was done!
Wednesday, October 27, 2010
CASE-ed Cards
I have two cards to share today. Both are CASE-ed from cards I saw on blogs but don't remember where. If you recognize either of the cards I will be glad to give credit to the original.
 The butterflies on this card are from Hero Arts and are the same stamp as the original card but colored differently with Prismacolor pencils and OMS. The border punch is from Martha Stewart and the embossing is a Cuttlebug folder.

The layout of this card is copied from the original but I have used a different paper, sentiment and image. The sentiment is from a Hero Arts clear set CL 272 and the imageis from a clear set by Stampendous. The brads are colored with Copic markers.


The layout of this card is copied from the original but I have used a different paper, sentiment and image. The sentiment is from a Hero Arts clear set CL 272 and the imageis from a clear set by Stampendous. The brads are colored with Copic markers.
Tuesday, October 26, 2010
A file to share
I don't have a card to share because what I have been working on cannot be made public yet lest the recipients of these swaps see them! I do have a file of Christmas images that I found on the web. Apparently some of you are having a hard time finding the images by searching. This is a zip file that you can download from 4shared containing 4 images, jingle bells, candy cane, ornaments and baubles. Download the file HERE
Thursday, October 21, 2010
Joy
It is about time I updated my blog! My daughter has been here visiting from CA and took over my craft room. The room serves as both a craft room, computer room and a guest room so my access was limited. While she was here we did do some craft shopping and I bought more than I normally would have as she is very good at spending my money for me! I did manage to make this card yesterday.

The card was more of an experiment really. When reading a discussion about silver and gold on Susan's
blog I was reminded about metallic pens that I had.
To get the gold line I positioned a square Nestie over the stamped image and used a metallic gold gel pen to trace around the inside of the Nestie. I then put it through the Cuttlebug to cut and emboss the panel. Colored pencils were used to color the image.
STAMPS: 'A gift for you' clear set from Flourishes. INK. Memento Tuxedo Black, Versamark. EMBOSSING POWDER:.Ranger Superfine Detail Gold. GEL PEN Gelly Roll Metallic Gold. NESTABILITIES square. EMBOSSING FOLDER: Cuttlebug. PRISMACOLOR pencils.
Tuesday, October 12, 2010

Sunday, October 10, 2010
Using up some scraps
I made a couple of cards using scraps. I hate to throw scraps away and while looking through my scrap drawer I came across this pretty piece that I wanted to do something with.

The DP is a scrap from a 4" x 6"designer mat pad from Ancestry.com, the pink is a scrap of Core'dinations Color Core and the card base is Bazzill. The sentiment is unmounted rubber from MSE I believe.

The DP is a scrap from a 4" x 6"designer mat pad from Ancestry.com, the pink is a scrap of Core'dinations Color Core and the card base is Bazzill. The sentiment is unmounted rubber from MSE I believe.
Friday, October 8, 2010
Birthday Wishes
These are two of the birthday cards I did for the sets.
 For this card I used the Lovebug Birthday stamp from Whipper Snapper and the sentiment is an un-mounted stamp from MSE I believe.
 A Martha Stewart border punch, a little DP, a digi stamp and clear sentiment stamp from MSE and colored pencils was all that was needed to create this card. After printing the digi stamp of the poppy I used a Pigma Micron pen and a ruler to draw the frame around the poppy.


Thursday, October 7, 2010
Just To Cheer You
This card has the same layout as the last one. I used a bold DP for the border and circle Nesties and a punch for the sentiment.


Wednesday, October 6, 2010
Simple Thank You

This is a very simple thank you card. Again I used a scrap of DP for the border on the left. I stamped the sentiment from MSE and the branch from Stampin UpToile Blossoms then used Nesties to cut the oval shapes.
Tuesday, October 5, 2010
Punch Drunk Butterflies
I am sorry that I have been missing again for so long. Since my return from my trip I have been catching up on some obligations I made prior to the trip. I had to make my swap cards....which I forgot to take pictures of... and I also had to make 20 cards for a fundraiser. For the next few days I will be posting pictures of a few of the cards I made for the fundraiser. The cards sell in sets of 10 mixed cards. Some that I made are the same or very similar to other I have posted before so those I will not repeat.
 You could call this card a scrappy card. I used a few scraps to punch squares and butterflies. The squares are matted on a solid color and I sponged the edges of the butterflies to make them stand out a little. Just the bodies of the butterflies are glued down.

Thursday, September 30, 2010
Back Home
Sorry about the lack of posts but I have been out of town. I went to CA to surprise my daughter for her birthday and as she reads my blog I couldn't say anything! While I was away Deborah asked for the link to the image that I used for Jingle All The Way You can find it HERE Deborah!
I made my daughter's birthday card back at the beginning of the month and put it in a 'safe' place.....so safe that when I went to get it to take with me I couldn't find it! I had taken a picture of it though. I took her another card and when I find the original I will send it to her! This is the card I can't find.

I made my daughter's birthday card back at the beginning of the month and put it in a 'safe' place.....so safe that when I went to get it to take with me I couldn't find it! I had taken a picture of it though. I took her another card and when I find the original I will send it to her! This is the card I can't find.

Monday, September 13, 2010
More Christmas
This is the last Christmas card for a while!

No this is not a new Nestie shape it is a mistake! The image is a digi image and I printed it to close to the edge of the paper. When I used the Nestie Label 4 to cut it out it one of the little points at the side was cut off so I just cut the other one off too! It doesn't show in the picture but I used Glossy Accents on the berries and the bobble on the hat.
For the border on the green panel I used the MS scoreboard and then cut the DP to fit between the scoring. The label is popped up with dimensional tape.
Sunday, September 12, 2010
Holly and Baubles
This is another image I found by searching for Christmas coloring pages.

To get the white border around the Nestie labels 4 I taped the die to the card stock and used a craft knife to cut around the outside of the die. This layer is popped up with dimensional tape.
Saturday, September 11, 2010
Jingle all the way

Friday, September 10, 2010
Another Poinsettia
This is another card using the same digi image. This time it is larger and reversed. That is the great thing about digi images, you can have them any size you want and reverse the direction!

Thursday, September 9, 2010
Poinsettia
This is another Christmas card I made to add to my stash.

Pretty simple. I used a digi image colored with Prismacolor pencils and OMS.
Sunday, September 5, 2010
Merry Christmas Snowman
I have really been struggling to make a card these last few days. I definitely have brain freeze! Although I am not thrilled with this card I am going to show it to you anyway.

The imagee is a digi image I found on the internet colored with Prismacolor pencils and OMS. I used the Swiss Dots folder from Cuttlebug and a Martha Stewart edge punch.
Wednesday, September 1, 2010
'hats all she wrote
I have been neglectful of my blog for a week or more. Bad me! Can you believe that it is September already?! I shall try to do better this month. This is a card I made for a swap. The theme is fashion.

I used the Cuttlebug Embossing Plus Elegant Ellipse folder for the panel backed with DP. The 3D hat is from a sheet in my stash. The embossing at the top and left side of the card was done with the Martha Stewart scoreboard.
Monday, August 23, 2010
Beautiful roses
When I found this beautiful rose image I knew I had to make a card with it. The image is from Jak Heath and you can see the beautiful wedding card she made and download the image HERE

I printed the image 4 times and for the base layer I used an oval Nestie and traced around the inside between the image then cut it out around the oval and the overlapping parts of the image. I then used the same Nestie to cut the underneath panel. I cut the other 3 images apart to make a 3D image.
Thursday, August 19, 2010
Delivery Boy Santa
This is the third and last digi stamp I bought from Sassy Cheryl.

Wednesday, August 18, 2010
One Flake At A Time
This is the second digi image that I got from Sassy Cheryl. It is called Twiggy the Snowman.

The DP is from DCWV, the image was colored with pencils and OMS. The sentiment is from a bulk buy of 100 unmounted stamps from Hampton Arts that I found on eBay.
Monday, August 16, 2010
Wind-up Santa
I keep my most used edge punches out where I can see them but I have a lot in a drawer that I forget about. This Martha Stewart snowflake punch is one that my daughter bought on clearance and we had both forgotten about it.

Friday, August 13, 2010
Poppy Dots
I don't know about you but I have a lot of strips of paper and cardstock that I didn't know what to do with. Heaven forbid I throw them away! While sitting pondering with a stack of strips in front of me I happened to look up and see all my border punches. I had a great time making pretty strips!
 I found this image already colored and mounted on a black panel..... I don't remember what I was going to do with it originally......and the green card base was sitting on my table so I put them together to come up with this card. Now to make some more cards with the strips I made.

Tuesday, August 10, 2010
Pretty In Peach
Wow I didn't realize that it has been 3 days since I posted! Well I didn't stay away from the stencils very long.This is the card I made yesterday.

Saturday, August 7, 2010
Elegant Ellipse

As promised this is a card made with the Cuttlebug Elegant Ellipse emboss and cut folder. This one didn't make a nice clean cuts either. Hmmm, maybe it is me and not the folder? The folders have two magnetic plates held together with some kind of softer plastic than the embossing folders which gives them a little play. I have just been putting the CS on the bottom plate and flipping the lid closed. I tried again being a little more diligent with making sure the sides met perfectly and it worked much better so it was me!
I cut an oval a little larger than the hole in the red layer for the image to show through. The image layer is glued to the background paper and the embossed panel is raised with dimensional tape.
I cut an oval a little larger than the hole in the red layer for the image to show through. The image layer is glued to the background paper and the embossed panel is raised with dimensional tape.

Subscribe to:
Posts (Atom)