Saturday, July 31, 2010

Christmas in July...just!

I have two more Chiristmas cards to share with you. I just made it in July with these!

This card is a quick and easy one. I used a Cuttlebug folder to emboss the card then used a Zig 2-way glue pen on the embossing and added crystal glitter for shine. The sentiment is a very old one, from 1990, by Stanpendous. I stamped it with Versamark ink and then embossed using Super Fine Embossing powder by Ranger.


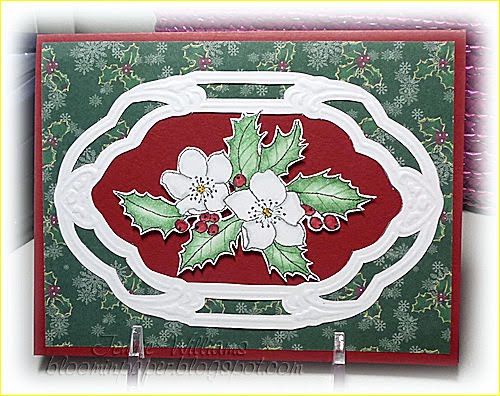
For this card I again use embossing stencils. This time I used a part of a border stencil EH1825. The stamp is Vintage Holly from Stampabilities colored with pencils and OMS. I found the stamp on clearance last year at Hobby Lobby so it may no longer be available. The sentiment is from a clear set by Hampton Art.The DP is from my stash of holiday papers from last year.

Friday, July 30, 2010

Sympathy

I made this card for another challenge but forgot to enter it!

 The stamp is another from the Toile Blossom set from Stampin Up that I colored with Prismacolor pencils and OMS. The sentiment is from a clear set but I don't remember who it is by. For the embossing I used a part of a Luxe Label AS0703 stencil and backed the cut out with pink DP. I added a couple of pearls to the embossing and the center of the flower.that I colored the pearls with a Copic markers.The white panel is mounted on a black card base.

Tuesday, July 27, 2010

Christmas in July

This may be the only Christmas card I do in July but it is a start.....even if it is late in the month! I just don't seem to be able to bring myself to drag out the Christmas stamps when the temperature is in the 90's.


Many years ago, while visiting my sister in England, I traced this image from some images she had for parchment craft cards. In the ensuing years the paper had gotten somewhat messed up so that when I scanned it with the idea of making a digi image from it it was a mess. I re-traced the image and scanned it again for a nice clean image and then printed it. I chose the DP and then colored the image and cut it out. For the frame I used Open Passe-partout  EH1824. I  traced around the inside of the stencil on the DP and cut it out so that the color of the card base would show. The image is popped-up with dimensional tape.  I am going to try this year....if I can get started soon enough.....to make one of a kind cards for everyone on my card list.

Sunday, July 25, 2010

Toile

A very simple card today. I really wanted to do something with this lovely DP from a package that I found at Big Lot's quite a while ago. What looks white is actually cream. I don't know why it comes out white in a picture!


 I cut the DP panel smaller than I would normally so that I could cut the edge punched piece even on each side.The punch is from MS. I used a Stampin Up stamp from the Toile Blossoms set, colored it with Prismacolor pencils and OMS, cut it out and attached it with dimensional tape.

Wednesday, July 21, 2010

Crisscross side card

Somewhere a long time ago I saw a picture of a card with a cut out side with a crisscross but no directions. I thought at the time that I would try it someday and then forgot about it. I also forgot to bookmark the page so I had to try it from memory. This is the result.

It is quite easy to do but I think thinner cardstock would work better than a thicker one. For the inside I used Core-dinations which is quite thick but was the only cardstock I had in the right color. I wrote directions for making the card and you can download the directions in PDF format HERE.  I chose to use a corner stencil to decorate mine but you could just as easily use a stamp. The stencil I used is Anja Style corner 4 FE 6126. you can find it HERE

Monday, July 19, 2010

Flowers & Butterflies

I did a little more experimenting with stencils. I have often use just a part of a stencil and repeated it on a card to get what I want. This time I wanted to see if I could use the whole stencil but on different parts of the card, the front and the back but with both parts showing when the card was closed. I used a pretty stencil, Mattie Lacy Fence EH1857, for the experiment. This is what the stencil looks like.


I wanted to use the curvy part on the front right edge and the rest on the back right edge so that when the card was closed the two parts would come together. This is the result.


The flower stamp I used on the front is from a clear set by Inkadinkado and the butterflies are from Blossoms and Butterflies from Whipper Snapper. I stamped the images twice and colored and cut out the flowers and butterfly wings and attached them with dimensional tape. The butterfly wings also have some glitter on them which doesn't show in the picture.


I decorated the inside of the card, which I don't do often, with another stamp from the Inkadinkado set and a sentiment which was part of an unmounted bulk buy from My Sentiments Exactly. I am really pleased with the way this card turned out! In the future though I will make sure before I do all the embossing and cutting that I have a stamp that fits the blank space. This time I was lucky that I had a stamp that fit.

Sunday, July 18, 2010

An experiment with vellum

While cleaning up my messy desk I found a small piece of vellum. This is Pergamano vellum which is thicker than the vellum you find at Michael's or Hobby Lobby. It has been a long time since I used vellum on a card so I thought I would experiment and see what I could do with it using an embossing stencil. This is the result.
What I found was that although it is pretty easy to emboss the vellum it is not so easy to cut it. As you can see if you look closely the cutting isn't very straight. To cut  through the vellum requires a lot more pressure than cutting cardstock. Also, embossing vellum stretches it and leave it wrinkled as you can see on the top left corner. I used vellum adhesive to attach the vellum panel but I only used a small piece in each corner and on each side. I should have run it all the way around the sides I guess. Well this was an experiment and I will know next time! The flowers are from a 3d sheet from my stash. The stencil I used is Anja Style corner stencil FE 6105. It is a great value as it has 4 different corners on one stencil. You can find it HERE

Saturday, July 17, 2010

Birthday card for a friend

This is a 5" square card that I made for a friend. I usually don't make square cards as the postage is more but as this is going to be in the package with her gift it didn't matter. The size of the card was dictated by the size of the embossing stencil. This stencil is Mattie pass-partout peacock EH 1833. ( scroll down the page to find it) the 3D flowers are hand cut from a sheet in my stash.

Friday, July 16, 2010

Petunias

 I can't decide if I like this layout or not. I had embossed the pink panel using a part of  border stencil EH 1825 as an experiment and it was laying on my desk. I just felt it was to small to be a square card. I also had the image printed so I colored it and cut it out and embossed it with a Nestie. You can get the image HERE.Then it was just a matter of cutting an aperture in the pink panel with a Nestie a size bigger than the image. Using DSP from my stash I used a Martha Stewart border punch on the bottom edge and accented the corners of the pink panel with half pearls.

Thursday, July 15, 2010

Another challenge card

This is another card I did for a challenge. This challenge called for white + 2. 


I have used this technique, using the mostly forgotten crimper, before and somehow it seemed to fit this challenge perfectly. It is quite easy to do. Cut a panel the size of your card. Mark the center point on all four sides, fold from the mark at the top of the panel to the mark at one side, then from the top to the other side and then from the bottom mark to the side marks. With the paper folded run it through the crimper and then open it up. The crimper will stretch the paper so it is necessary to trim the panel to make the edges straight again.
The digi image is a free one I found on the internet and you can get it HERE

Edited to note: I won this challenge!

Wednesday, July 14, 2010

CASE card

Inspiration isn't coming easy to me right now but reading through the blogs I follow I came upon this card by Bonnie and just loved what she did with a scoreboard! I had also previously colored this free digi image from Doodle Pantry so I decided to CASE Bonnie's card.

Saturday, July 10, 2010

Embossing stencils

Sorry no card right now but just a quick post. Carol asked where I get my stencils but she sent the comment with no email address so I couldn't reply to her privately. On all my posts where I have used stencils there is a link to where you can find them. The links are in purple and not underlined  not the blue link you are used to. ......had to match my blog! Anyway, there are only two places I can find in the US that have the stencils and I buy from both of them as they do carry different ones. The one with the biggest selection is http://www.kamya.com/templates.html the other is http://www.atouchofgrace-paperboutique.com/embossing-stencils.html. Both are great people to deal with.

Thursday, July 8, 2010

Mojo 146 challenge

Wow I did another challenge, very unusual for me! This is the card I made for the Mojo Monday sketch challenge.


The hibiscus flower is a digi image,  you can snag it HERE The sentiment is a part of a $1 stamp from Studio G. The flower is colored with Prismacolor pencils and OMS.

Saturday, July 3, 2010

More challenges!

For July there are a few challenges at Crafter's Digital Art Center. I decided to join two.


This is the card for the color yellow challenge. The image is a freebie that was offered by Daisy Doodles. The sentiment is a $1 stamp.

This card is for the sketch challenge and the image is from Fred She Said. Both images were colored with Prismacolor pencils and OMS. 

Before I tried OMS, Odorless Mineral Spirits, I used Turpenoid. I bought the OMS when I ran out of Turpenoid which is a turpentine substitute but both are brush cleaners. What I have realized after using both is that I like the Turpenoid better. Stumps seem to absorb it better and it doesn't evaporate as fast as OMS so I will be switching back to Turpenoid the next time I go to the store.

Friday, July 2, 2010

It's a challenge!

I joined Crafter's Digital Art Center and these cards are ones I made for challenges on that group. To join you can click on the badge in the right column.

This group is only a month old and the first challenge in June was an anything goes challenge. There were lots of freebie digi images to choose from and I chose an image from Isabella's Sketchbook called sweetheart flowers and made two cards in different colors.

 For this card I used part of a Marianne Designs Luxe Label and colored the flowers with pencils.


For the second card I used a MS punch, a Cuttlebug folder and oval and scalloped oval Nesties. I colored and cut out a second flower and used dimensional tape to give it some height.
I am still not recovered fully from the time change from my vacation....still working on Hawaii time which is 5 hours behind Texas so I am still going to bed late and getting up late. I hope I can get back to normal by the end of the holiday weekend!